基于keras+VGG |
您所在的位置:网站首页 › 宝可梦 分类 › 基于keras+VGG |
基于keras+VGG
|
目录
数据集VGG-16实战
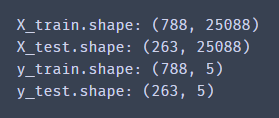
本文基于有一定的卷积神经网络基础之上进行VGG16模型的套用。 对于卷积神经网络来说,博主不太懂得到底几个卷积层,几个池化层才合适,才能最大程度的训练处我们想要的结果。导致前段时间一直去猜,去试。但是VGG16模型给了我们一个框架,比较适合小白了解CNN结构后进行模仿套用。这篇博客的目的就是能够让大家掌握如何去拆分已经训练好的模型结构,实现灵活使用。这样就能够能熟练的运用mlp和其他模型相结合实现更复杂的任务。 环境是python3.6+keras,后端是tensorflow-gpu1.12.0,怎么配环境可以参考博主上一篇博客哦。文末附预测结果及完整代码。 数据集给大家附上数据集。百度云链接 提取码:i5j0 首先介绍一下数据集,数据集采用博主大数据实验室的考核任务:宝可梦识别。 简单描述一下就是训练集有5类宝可梦精灵,然后分别在对应的文件夹。 有一个无标签的测试集。vgg16强大的地方就在这,小数据集也能够有很高的准确率。 然后介绍一下VGG16模型。一些基础的CNN知识博主就不再赘述了,咱们简单说下直接开始实战。 那我们怎么去用呢。 加载VGG16模型,剥除它FC层,对图像进行预处理把预处理完成的数据作为输入,分类结果为输出,建立一个mlp模型开始训练预测结果首先就是导入库和预加载模型,这里要提一下,加载vgg16博主花了大概6,7小时,不懂是网络问题还是什么,因为当时凌晨了就放着等它下载,第二天早上就好了,如果嫌慢的话大家就提前下载好,或者去查查有没有什么快点的办法。 # load image and preprocess it with vgg16 structure from keras.preprocessing.image import img_to_array, load_img from keras.applications.vgg16 import VGG16 from keras.applications.vgg16 import preprocess_input import numpy as np import os from sklearn.preprocessing import LabelBinarizer from keras.models import Sequential from keras.layers import Dense from sklearn.model_selection import train_test_split from sklearn.metrics import recall_score import matplotlib as mlp import matplotlib.pyplot as plt from matplotlib.image import imread from keras.preprocessing.image import load_img from keras.preprocessing.image import img_to_array from keras.models import load_model from PIL import Image # 载入VGG16结构(去除全连接层) model_vgg = VGG16(weights='imagenet', include_top=False) # imagenet表示加载提取图片特征的结构,然后Flase表示去除全连接层我们先定义处理一个图片的函数,到时候就可以设置个循环,让他自动处理每张图片 # define a method to load and preprocess the image def modelProcess(img_path, model): img = load_img(img_path, target_size=(224, 224)) # 读取图片途径,裁成224,224 img = img_to_array(img) #转换成图像数组 x = np.expand_dims(img, axis=0) # 加一个维度这样能载入VGG x = preprocess_input(x) # 预处理 x_vgg = model.predict(x) #特征提取,这是全连接层之前的shape # shape(1,7,7,512) x_vgg = x_vgg.reshape(1, 25088) # 摊开来进行和全连接层的对接 return x_vgg前文讲到vgg16每张图片都是224×224×3,实验室狗的很,里面还有4通道,图片格式也不统一,有jpg,jpeg,png,那这个函数就是统一下,让图片能够变成224×224×3 # list file names of the training datasets def transform_format(path): # 转换格式 folders = os.listdir(path) # 读取爷爷路径下的所有文件名,也就是5个分类标签 for j in range(len(folders)): dirName = path + '//' + folders[j] + '//' # 每一个爸爸路径 li = os.listdir(dirName) # 每个爸爸路径,也就是那个类别文件夹下的全部图片名字 for filename in li: newname = filename newname = newname.split(".") # 文件名以'.'为分隔, if newname[-1] != "png": # 这里转换格式用的是简单的重命名 newname[-1] = "png" newname = str.join(".", newname) # 这里要用str.join filename = dirName + filename newname = dirName + newname os.rename(filename, newname) # 重命名 print('reading the images:%s' % (newname)) # 这步前期我是用来调试哪张图的读取出问题了,现在可删可不删 a = np.array(Image.open(newname)) # 读取图片数组 if ((len(a.shape) != 3) or (a.shape[2] != 3)): # 有些图片非RGB,这里进行判断处理 a = np.array(Image.open(newname).convert('RGB')) # 换成RGB img = Image.fromarray(a.astype('uint8')) # 形成图片 img.save(newname) # 替换原来的图片 print(a.shape) # 用来测试的print print("全部图片已成功转换为PNG格式") print("全部图片已成功转换为RGB通道")前文都是对单张图片的处理,我们这么多图片,要设置一个循环读取每张图片的,那就是这个了函数了。其中呢对于路径的父子关系,可要看清楚,爷爷路径是pokemon,然后pokemon下面有5个文件夹,每个文件夹都是一类,这就是爸爸路径,那儿子路径就是真正的每张图片的路径,也就是分类文件夹里面的了。 def read_data(path): folders = os.listdir(path) # 读取爷爷路径下的所有文件名,也就是5个分类标签 for j in range(len(folders)): # 5个种类嘛,一共循环5次 folder = path + '//' + folders[j] # 这个就是爸爸路径了 dirs = os.listdir(folder) # 读取爸爸路径下的所有文件名,就是各个图片名字了 # 产生图片的路径 img_path = [] for i in dirs: if os.path.splitext(i)[1] == ".png": # 已经转换过png了 img_path.append(i) img_path = [folder + "//" + i for i in img_path] # 这里就是真正的儿子路径了,也就是每个图片的完整路径 # 开始处理 features1 = np.zeros([len(img_path), 25088]) # 弄好每个图片的数组框架 for i in range(len(img_path)): feature_i = modelProcess(img_path[i], model_vgg) # 这就运用上面函数进行每张图片处理 print('preprocessed:', img_path[i]) features1[i] = feature_i if j == 0: # 这边判断的目的是把5个分类的图片数组全部加到一起 X = features1 # 第一次循环,那就只有一个,注意j在最上面 else: X = np.concatenate((X, features1), axis=0) # 之后的每次循环把上一个种类的图片数组和这个种类的所有图片数组加到一起 return X # 最后就全部加到一起了,此时X是5个分类都在了,也就是全部训练集这里的函数是读取标签的。 def read_label(path): y = [] folders = os.listdir(path) # 读取爷爷路径下的所有文件名,也就是5个分类标签 for j in range(len(folders)): dirName = path + '//' + folders[j] + '//' # 爸爸路径 lens = len(os.listdir(dirName)) # 看看爸爸路径下的这类图片有多少个 for i in range(lens): y.append(j) # 这类别的图片有多少个,那我这类的标签就加多少个 lb = LabelBinarizer() y = lb.fit_transform(y) # 进行one-hot编码 return y但是呢博主还是写了个不用函数读取标签,因为我们后面还要解码哇,如果是函数读取标签,那么后面就检测不到独热编码的实例化,也就没办法解码。 这么说吧,如果在函数里编码,函数是封装的呀,那就隔离了,后面之所以能解码对应起来是因为我之前经历过了呀,但是我被隔离了就相当于没有经历,因此如果是函数编码,后面就不能解码,也就没办法进行正确率的对比。那如果硬要用函数呢,那也可以,就把后面显示正确率的那块代码删除就好啦,但是为了演示我们这个网络的好坏,这里博主还是不用函数来读取标签。 path = 'D:/桌面/大数据应用实验室招新考核题目1/pokemon' # 这个就是训练集的爷爷路径 # 标签独热编码 y = [] folders = os.listdir(path) # 传入爷爷路径 for j in range(len(folders)): # j取值是0,1,2,3,4,分别代表5个种类 dirName = path + '//' + folders[j] + '//' # 爸爸路径 lens = len(os.listdir(dirName)) # 看看爸爸路径下的这类图片有多少个 for i in range(lens): y.append(j) # 这类别的图片有多少个,那我这类的标签就加多少个 lb = LabelBinarizer() y = lb.fit_transform(y) # 进行one-hot编码 transform_format(path) # 转换格式 X = read_data(path) # 这里就运行读取数据了 print('X.shape:', X.shape) print('y.shape:', y.shape) print('-' * 35)我们来看看批量读取效果 看看各个的维度 模型初始化 # 模型初始化 model = Sequential() model.add(Dense(units=40, activation='relu', input_dim=25088)) # 输入的维度是25088 model.add(Dense(units=5, activation='softmax')) # 因为我们预测的宝可梦是5类,所以units=5,多分类一般用softmax,如果是二分类就是sigmoid model.summary() # 查看结构看看我们模型结构,当然了,前面的结构都是前文的VGG16,我们这里主要查看我们的全连接层结构。 就是这了,如果用函数读取标签的话这块就要删掉了,为了判定我们模型的好坏,我就保留,运行给大家看看。 # 训练集准确率 y_train_predict = model.predict_classes(X_train) # 这就是根据训练集来预测训练集结果 y_train = lb.inverse_transform(y_train) # 前面进行独热编码了,独热编码是计算机看的标签,那得转回人能看得懂的,这里就是解码的意思 accuracy_train = recall_score(y_train, y_train_predict, average='macro') # 把实际的和预测的往里丢 print('-' * 35) print('accuracy_train:', accuracy_train) # 验证集准确率 y_test_predict = model.predict_classes(X_test) # 这就是根据验证集来预测验证集结果 y_test = lb.inverse_transform(y_test) # 前面进行独热编码了,独热编码是计算机看的标签,那得转回人能看得懂的,这里就是解码的意思 accuracy_test = recall_score(y_test, y_test_predict, average='macro') # 把实际的和预测的往里丢 print('-' * 35) print('accuracy_test:', accuracy_test)看看我们测试集和验证集的正确率吧,可以看到还是很不错的哦,才迭代30次,而且数据集这么小能取得这么高的准确率还是可以的。证明了我们vgg16模型的强大。 到此就训练完了,那就开始测试吧。 test_path = 'D:/桌面/大数据应用实验室招新考核题目1/test/test/' # 这个就是测试集的爷爷路径 # 测试图片预处理 transform_format('/'.join(test_path.split('/')[:-2])) # 画出预测图及标签 要对中文进行设置 不然显示不出中文 font2 = {'family': 'SimHei', 'weight': 'normal', 'size': 20} mlp.rcParams['font.family'] = 'SimHei' mlp.rcParams['axes.unicode_minus'] = False # 宝可梦对应字典 pokemon_dict = {0: 'bulbasaur', 1: 'charmander', 2: 'mewtwo', 3: 'pikachu', 4: 'squirtle'} folders = os.listdir(test_path) # 传入宝可梦 num = len(folders) fig = plt.figure(figsize=(10, 10 * (int(num / 9) + int(num % 9 / 3) + 1 * (num % 9 % 3)))) # 这一步的意思是,根据前期测试,10*10大小的图片放3*3,9张图片最佳 # 那就可以根据所有测试图片的数量来确定最后画出的图的大小 for j in range(num): # 这些步骤其实都和前面差不多,就是对图片进行预处理,这样能够输入进网络 img_name = test_path + folders[j] img_path = img_name img = load_img(img_path, target_size=(224, 224)) img = img_to_array(img) x = np.expand_dims(img, axis=0) x = preprocess_input(x) x_vgg = model_vgg.predict(x) x_vgg = x_vgg.reshape(1, 25088) # 到这预处理就完了 result = model.predict_classes(x_vgg) # 这就是预测结果了 # 那我们要考虑把预测结果和要预测的图画出来,这里定义画出250*250大小的图 img_ori = load_img(img_name, target_size=(250, 250)) plt.subplot(int(num / 3) + 1, 3, j + 1) # subplot就是一张大图里面有多少小图的意思,也是根据总共测试图的数量来确定的 plt.imshow(img_ori) # 展示 plt.title('预测为:{}'.format(pokemon_dict[result[0]])) # 每个预测图题目写上预测结果 plt.subplots_adjust(top=0.99, bottom=0.003, left=0.1, right=0.9, wspace=0.18, hspace=0.15) # 控制每个子图间距 plt.savefig('D://桌面//1.png') #保存咯,路径自己改下总的来说vgg16模型在对于小数据集上有其独特的优势。 最后给大家贴上最后预测结果,看看有没有眼尖的小伙伴发现预测错的。 |
【本文地址】
今日新闻 |
推荐新闻 |
 训练集每种宝可梦有250左右。

 VGG16的输入图像:224×224×3的RGB图,3个通道 训练参数:约138,000,000个 特点:
 读取起来看着屏幕刷新,有一种很爽的感觉。 分隔训练集,验证集。


 完整代码
完整代码